

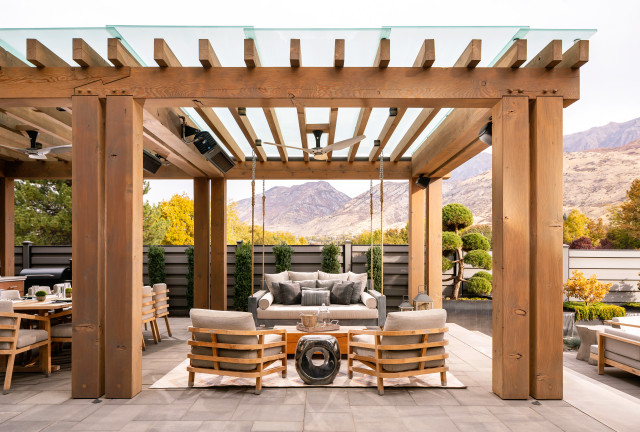
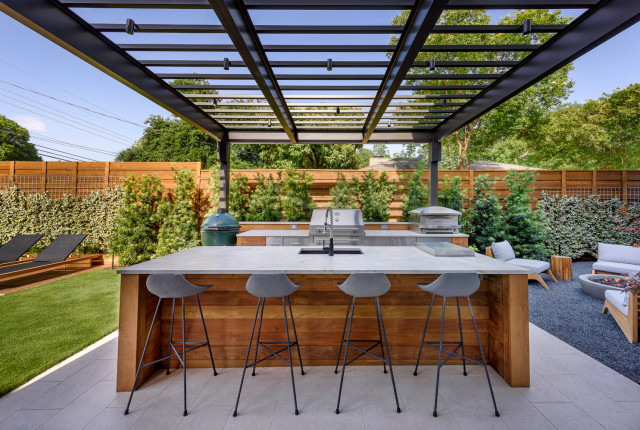
A pergola is remarkably versatile. The material it is made of and where you place it in your garden can turn it from a functional but basic structure into a one-of-a-kind statement piece. Extras can range from lights, ceiling fans and adjustable overhead slats to entertainment systems, fire features and outdoor kitchens.
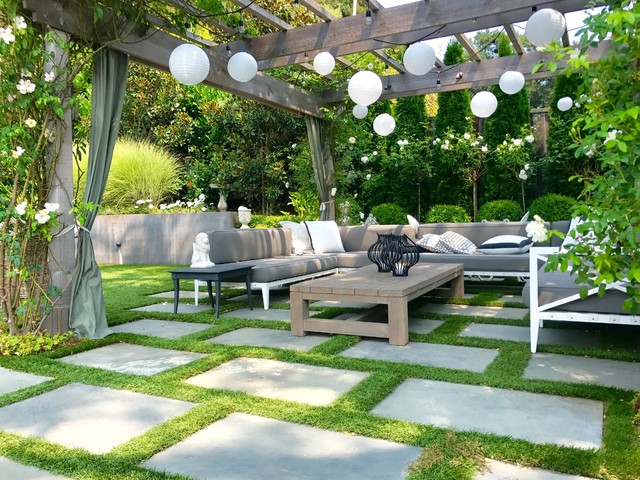
A pergola covered with plants, both on the exterior and hanging inside, is the very definition of a garden room. For avid gardeners, this makes a pergola the perfect spot to show off spectacular climbing or vining plants — anything from ivy and wisteria to roses and clematis. You could even add some edibles, such as tomatoes or grapes.
Here’s what to know about adding a pergola to your yard — including ideas for the design and location, the pros and cons of different materials, and whom to hire.
What Is a Pergola?
A classic pergola’s design is deceptively simple. It consists of four posts, which in turn support four crossbeams or a mix of beams and rafters around the top perimeter of the structure. A slatted or lattice roof provides filtered shade.
A pergola has the look of an arbor and, like an arbor, is traditionally covered with climbing or vining plants. The primary difference between the two structures is size. Pergolas are designed as places for lingering rather than passing through, so they are usually much larger, with dimensions similar to those of a gazebo or pavilion. Think of it as a hybrid of garden structures.
Whom to Hire
For most homeowners, hiring a landscape architect, designer or contractor is necessary for adding a custom pergola. Even with pergola kits, hiring a contractor is a good choice. For more extensive landscape projects, look for a landscape architect or designer. While the cost is higher, a professional can help you finalize your plans, including what will work best to provide the right blend of sun and shade.
Landscape professionals will also analyze your proposed site and do any necessary prep work; get permits; mark off water, gas and power lines; and coordinate workers. If you’re adding electricity for lighting and fans, you will need a licensed electrician. A professional should also be hired to install gas and plumbing lines. You may also want an expert to help with installing entertainment systems.
Before choosing a professional for your pergola project, be sure to see if he or she has experience with building the type of pergola you want. As with any project, check reviews on Houzz and elsewhere, and ask for references and to see examples of work.
Expert do-it-yourselfers can order pergola plans or a kit with pre-cut pieces. If you do choose a kit, be sure the materials will stand up to your climate and site conditions. Before you consider this route, take stock of your tools and your expertise level. In addition to building, you’ll also need to take on the legwork of getting permits, preparing the site and checking for gas and plumbing lines. Remember that much of your work will be done on the top of the pergola, and staying safe while working on overhead elements is essential.
Design Considerations for a Pergola
Pergolas can be incorporated into almost any area of the landscape and can serve a variety of purposes. You can also adapt them to fit your personal style and preferred materials. Here are some things to consider when adding a pergola to your yard.
Pergolas can be incorporated into almost any area of the landscape and can serve a variety of purposes. You can also adapt them to fit your personal style and preferred materials. Here are some things to consider when adding a pergola to your yard.
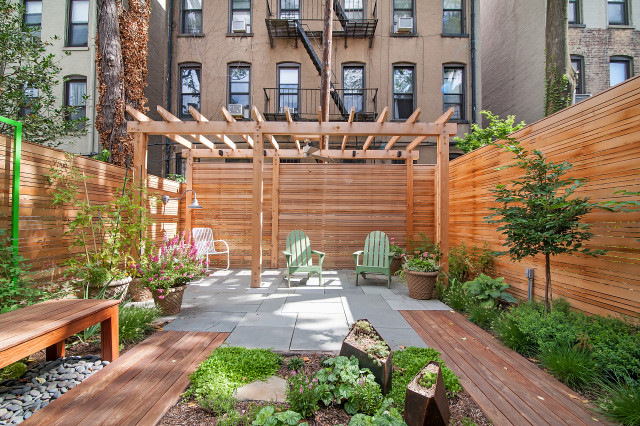
Where it will go. Consider placing a pergola where it can best suits your needs — creating a getaway spot or secondary dining or seating area, overlooking a stellar view, capturing summer breezes or providing a bit of shade in an otherwise too-hot section of your yard.
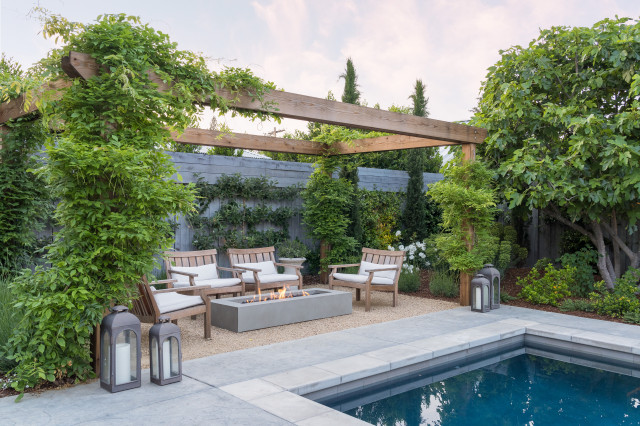
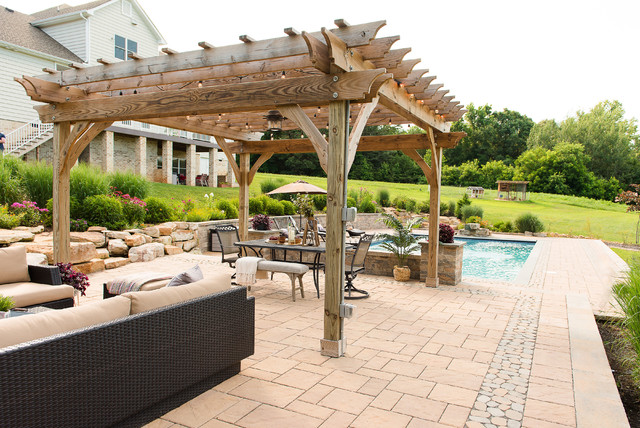
Pergolas can also add a sense of enclosure for a hot tub or spa, while still keeping the space open to the landscape. Situating a pergola at the end or side of a pool creates a convenient spot for lounging away from the direct sun.
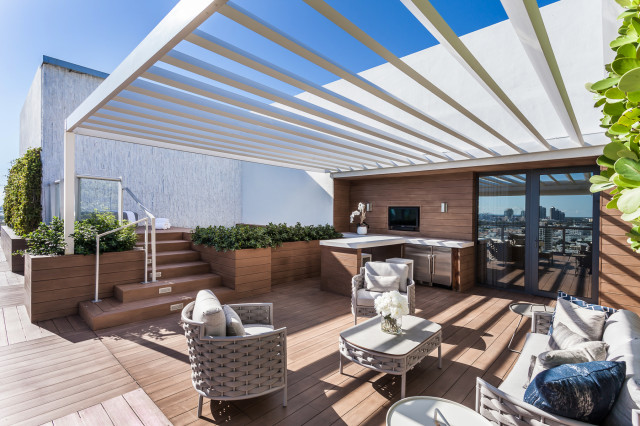
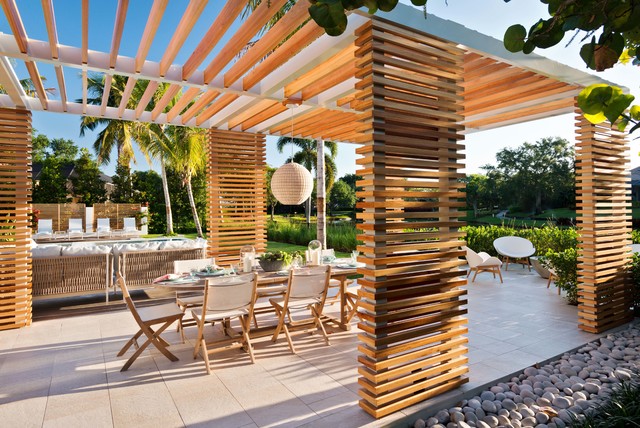
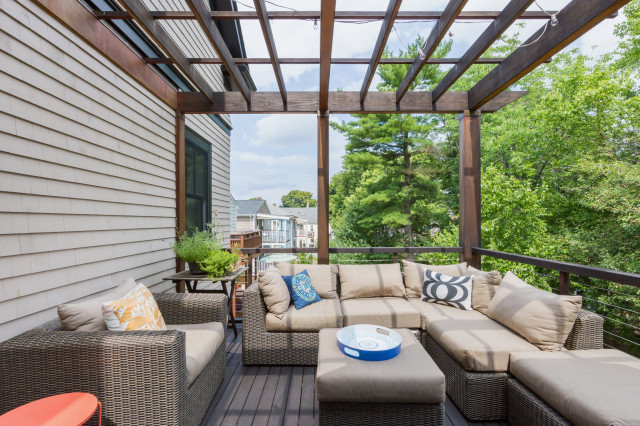
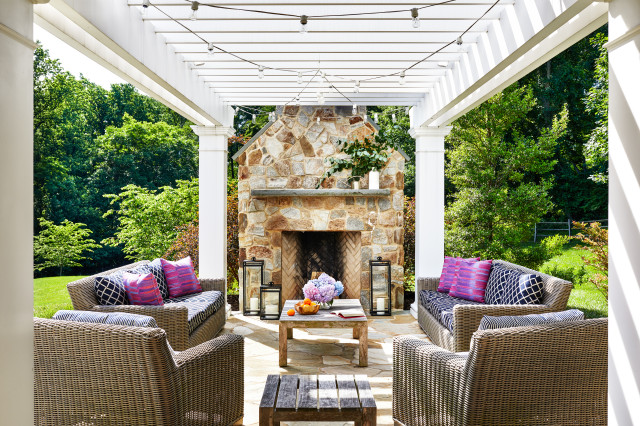
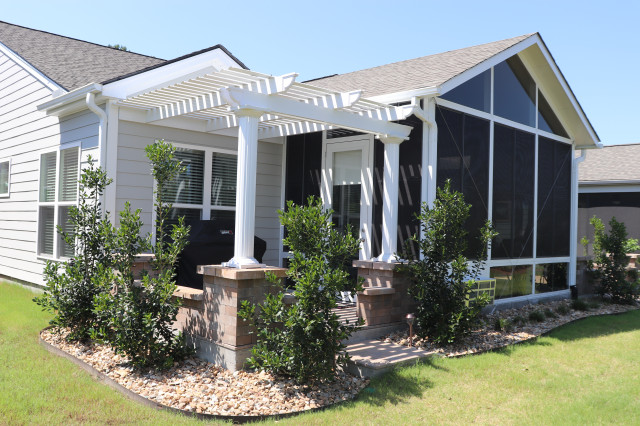
You can also add a pergola as part of a larger deck or patio project, as a freestanding structure or attached to one side to your home or another structure. Use a pergola within a larger deck or patio to define the dining area or outdoor kitchen, create a conversation area or add some afternoon shade.
Size. Once you’ve decided how you want to use your pergola, you’ll need to determine how large you want to make it. If you’re planning to use the space for lounging or dining, be sure to allow enough space to make it comfortable for you and your guests.
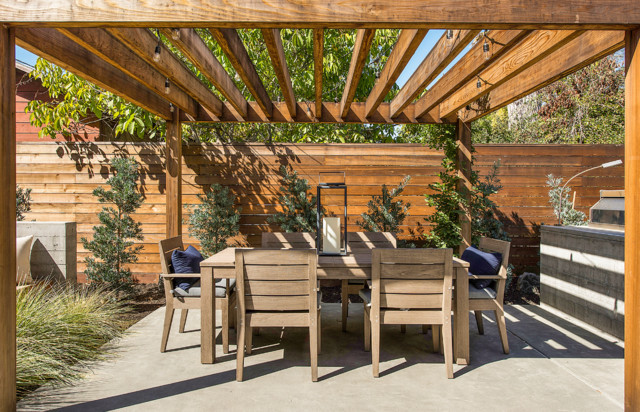
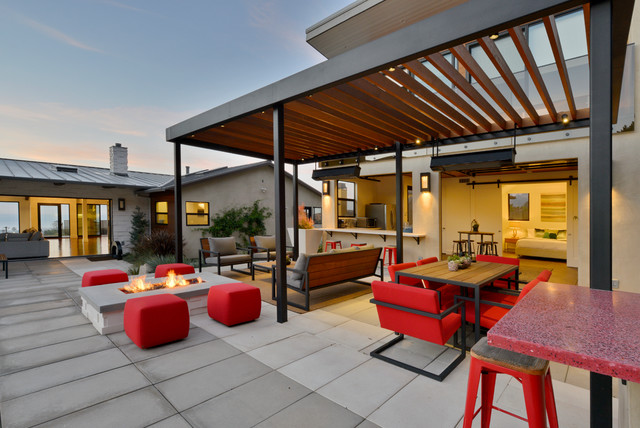
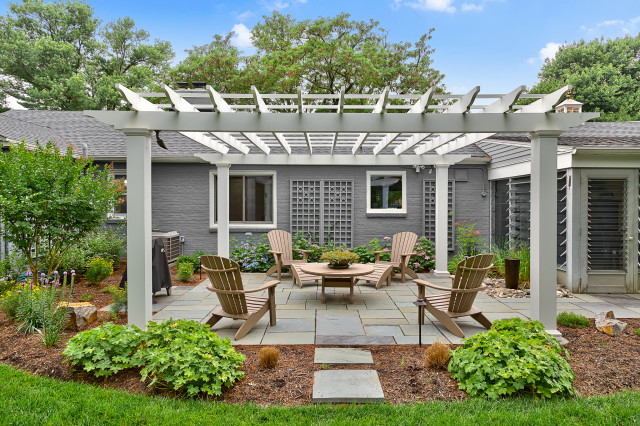
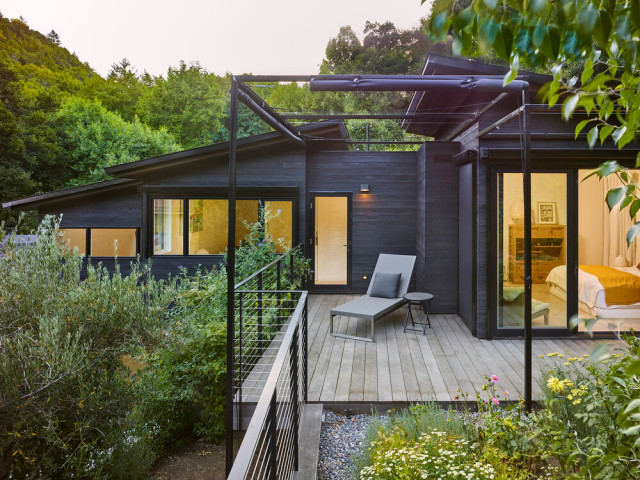
Style. The look you want is also a key factor in choosing a pergola design. Match your pergola style to both your home and your landscape to make it feel like a cohesive part of the entire concept. You might opt for wood in a naturalistic garden and with a traditional home, or a sleek metal design for a contemporary home. If you really want your pergola to stand out, consider a design that will add some unexpected contrast.
The size of the support posts and overhead pieces will affect the look of your pergola. Slender posts and beams, whether made of metal or wood, lend themselves to a more refined and less intrusive look. More robust posts will add more weight and presence, along with rustic appeal.
The size of the support posts and overhead pieces will affect the look of your pergola. Slender posts and beams, whether made of metal or wood, lend themselves to a more refined and less intrusive look. More robust posts will add more weight and presence, along with rustic appeal.

Roof structure. Consider if you’d like your pergola to protect the space beneath it from sun and rain or to simply provide structure for climbing plants or overhead string lights.
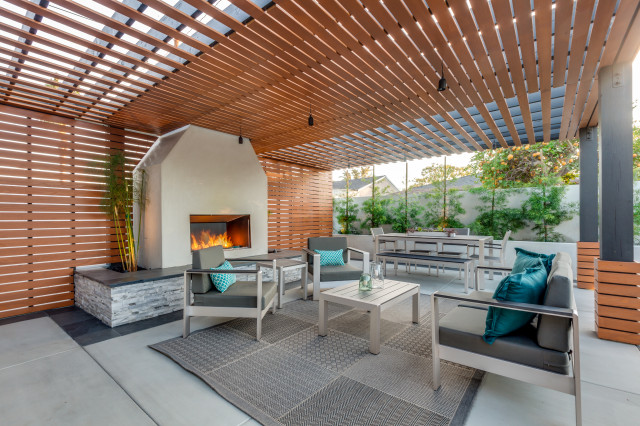
The spacing of overhead slats and how they are set, whether horizontally, vertically or at an angle, will determine the amount of sunlight that reaches the interior of a pergola throughout the day. Movable overhead slats or louvers can be adjusted to adapt to the available sunshine or even shut completely in case of wet weather.
Shade cloths and retractable canopies can provide additional overhead protection. For a more open, less confining feel, think about designing a gabled or arched roof, or even eliminating any sort of roof altogether.

Side walls or screens. While the sides of a pergola are traditionally left open, adding lattice screens, partial walls or even a full wall on one side of a pergola can provide privacy if needed. Less permanent privacy options include installing curtains or shades that can be pulled shut when needed, or lining the sides with tall plants.
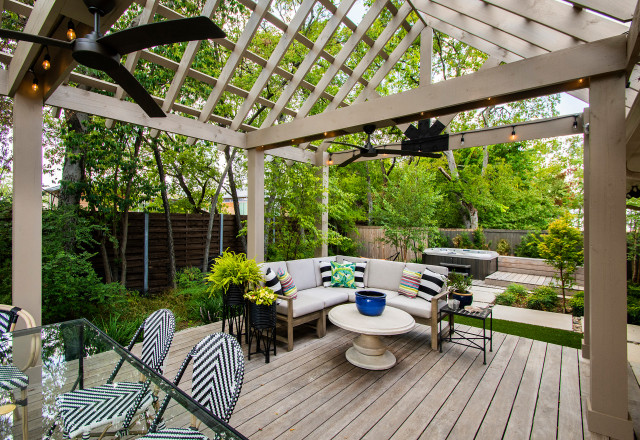
Bonus features. Depending on your needs and where you live, you may consider adding amenities such as lights, fans and mounted heaters. Other options include permanent seating — perhaps even a swing — and gas and electrical lines for features like a fire pit or spa. Keep in mind that these features can increase the project’s overall cost and installation time.
Material Options for a Pergola
Many people think of wood when it comes to pergolas, but your material options are surprisingly wide. Vinyl and fiberglass pergolas are lightweight and long-lasting options, as are aluminum pergolas. Steel pergolas are heavier but also a good choice to consider.
Many people think of wood when it comes to pergolas, but your material options are surprisingly wide. Vinyl and fiberglass pergolas are lightweight and long-lasting options, as are aluminum pergolas. Steel pergolas are heavier but also a good choice to consider.
Wood. Wood remains a favorite choice for outdoor structures, especially pergolas, thanks to its natural good looks, adaptability and durability — it’s able to handle most weather conditions. Wood pergolas can be either freestanding or attached. Their cost is typically in the midrange for material options.
Naturally rot- and pest-resistant woods, such as California redwood and western red cedar, are good choices for a pergola, but these materials can be regional and difficult to find, depending on where you live. If it’s difficult to find them, you can check with local building suppliers for good substitutes for your location. Tropical hardwood options include ipe, teak and mahogany; they’re pest- and rot-resistant, good for coastal locations. Before you buy, check that the wood is certified as sustainable by the Forest Stewardship Council (FSC). These woods are also more expensive and can be harder to work with than some other types.
A final option is pressure-treated woods. These are usually competitively priced and easy to work with, but folks might have concerns about using materials that have been treated with chemicals to make them more long-lasting.
While outdoor-grade wood is a good choice for landscape projects, it may not last as long as high-quality vinyl, fiberglass or metal. Any type of wood requires sealing and usually staining or painting when you first install it. Sealing will keep cedar, redwood and mahogany from fading to gray. While hardwoods can be painted, many people prefer to simply seal them to showcase their natural beauty. Redwood and pressure-treated lumber can also be stained or painted.
You’ll also need to maintain that finish, resealing and staining every year or two and repainting every few years. Even with regular maintenance, you may need to make more extensive repairs after 10 years or so.
If you’re growing plants on your pergola, the moisture from the plants themselves, combined with their weight, can damage wood posts and overheads. Trim back the plants and check for signs of damage yearly.
Vinyl and fiberglass. High-quality custom-made vinyl pergolas and vinyl pergola kits are readily available and a great choice for a traditional look at a reasonable price. Vinyl pergolas are very long-lasting and relatively maintenance-free, requiring only cleaning every year or so to keep them looking good.
Vinyl pergolas come in limited colors — primarily shades of white — and can’t be painted. Their light weight limits their overall span, and they can sag under a snow load. They are usually freestanding, but some companies do offer the option to attach them to a home.
Fiberglass pergolas, whether you choose a kit or have one custom-made, are less common than their vinyl cousins but share their care requirements. They are also one of the higher-priced choices, but they make up for the initial cost with their long-term low maintenance costs. They can be freestanding or attached, and your choice of styles and colors is far greater than with vinyl options — they can also can be painted. Though still lightweight, they are much sturdier than vinyl, especially for snow loads.
Metal. For a clean, contemporary look that will last for years, consider a pergola made of aluminum or steel that has a finish to prevent rust. Your options include both custom designs and pergola kits. If you choose the latter, make sure it is high quality to get the long lifespan these materials are known for. Pergolas of either material can be freestanding or attached to the home.
Aluminum is a good choice for coastal locations, thanks to its resistance to rust. Its cost is higher than vinyl’s but usually lower than or equal to that of wood. One thing to know about an aluminum pergola is that its light weight means it has to be well-anchored in areas with heavy wind.
Steel is heavier, making it stronger and more impervious to weather. It also can span longer distances without needing supports, which is a bonus for larger installations. It falls on the high end of costs for materials.
Both materials are strong and extremely low-maintenance, and are good choices for a range of climates. Wipe down finished steel or aluminum with a noncorrosive cleaner every year or so. That’s also a good time to check the connections on the pergola to be sure they haven’t loosened.
Other Considerations for Adding a Pergola
Permitting and codes. Before starting any pergola project, check with your local building department about the necessary permits and code requirements. While smaller structures, usually under 100 square feet, may not need permits, there still may be regulations that will affect the overall height and where you can build. You’ll also need to check on the location of any gas, water or power lines before you level the ground or dig for footings.
If you belong to a homeowners association, check for any guidelines or restrictions regarding location, size, materials or finishes.
Anchoring your pergola. Whatever your pergola’s material or style, you’ll need to be sure its posts are securely anchored to the ground. Pergolas over decks and concrete slabs can be anchored with fasteners that are specifically designed for that purpose. For other surfaces, including pavers, the posts will need to be set into the ground. This involves pouring concrete footers or installing anchors on a footing that can literally screw into the ground. If you live in an area that experiences freeze-thaw cycles, the posts will need to be set below the frost line. An experienced landscape contractor will be able to handle any of these installations.
When to do this project. As with any outdoor project, the best time to build is during good weather from spring to fall.
How long it will take. Depending on the complexity and the amount of preparation needed, including time for setting concrete footings and staining or finishing the materials, it could take about a week to build a basic pergola (after you’ve got a landscape pro on board). If your design is more complicated or you’re installing amenities such as an outdoor kitchen or fireplace, expect a longer timeline.
Content provided by Marianne Lipanovich at Houzz.com
Winter Storm 2021: Emergency Plumbing Resources